Cloud Native Dev - Challenge 1
It’s been some time since I engaged in a conversation with Mauricio Salatino, widely known as Salaboy, about embarking on a mentor-mentee journey to enhance my Cloud Native skills. After much anticipation, we’ve finally launched the “program” (if I can call it a program)!
Excitingly, it’s structured into challenges, and I invite you to join me on this learning journey!
Challenge 1
The first challenge can be found here and is about building a simple web application. My repo can be found here. Of course, I used chatGPT to help me, and Salaboy said it was allowed! The end goal is to understand what I’m building. So here I’m going to explain what does what.
Step 1: Setting up the Backend
- Since we decided to build the web app with Node.js we need to install it on our machine. I had homebrew installed so I just ran the command
brew install nodeand voilà. - Next we need to create a directory for our project (in my case `cloud-native-dev) and navigate to it.
- Initialize a Node.js project with the command
npm init -y - Install Express with the command
npm install Express.
At this point, we’re all set to start writing our code. You can start by creating the directories and files that you’re going to need or create them as you go but basically, my directory structure will be as follows (notice I’m following best practices for separating concerns by keeping static files in a public directory):
cloud-native-dev/
└── 1-challenge/
    ├── README.md
    └── app/
        ├── public/
        │   ├── index.html
        │   └── app.js
        └── server.js
Step 2: Writing the Backend Code
Create a file named server.js in your project directory and add the following code:
const express = require('express');
const path = require('path');
const app = express();
const PORT = 3000;

// Middleware to parse JSON bodies
app.use(express.json());

// Serve static files from the 'public' directory
app.use(express.static(path.join(__dirname, 'public')));

// In-memory store
const texts = [];

// Endpoint to save text
app.post('/save', (req, res) => {
  const { text } = req.body;
  texts.push(text);
  res.status(201).send({ message: 'Text saved successfully' });
});

// Endpoint to get all texts
app.get('/all', (req, res) => {
  res.status(200).json(texts);
});

app.listen(PORT, () => {
  console.log(`Server running on http://localhost:${PORT}`);
});
This script sets up a basic Express server with two endpoints: one to save text /save and another to retrieve all saved texts /all. They will handle storing texts in memory and retrieving them.
Step 3: Setting Up The Frontend
Create a new file named index.html in your project directory. As a static file, it will be under a public folder. Paste the following code:
<!DOCTYPE html>
<html lang="en">
<head>
<meta charset="UTF-8">
<meta name="viewport" content="width=device-width, initial-scale=1.0">
<title>Text Saver App</title>
</head>
<body>
<h2>Text Saver</h2>
<textarea id="textArea"></textarea><br>
<button onclick="saveText()">Save Text</button>
<ul id="textsList"></ul>

<script src="app.js"></script>
</body>
</html>
This HTML structure provides a user interface for inputting and displaying text.
Now create a new file named app.js in your project directory (again, I’m keeping my static file under a public folder), and paste the following code:
// Function to save text
async function saveText() {
    const text = document.getElementById('textArea').value;
    await fetch('/save', {
      method: 'POST',
      headers: {
        'Content-Type': 'application/json',
      },
      body: JSON.stringify({ text }),
    });
    fetchAllTexts(); // Refresh the list after saving
  }

  // Function to fetch all texts
  async function fetchAllTexts() {
    const response = await fetch('/all');
    const texts = await response.json();
    const list = document.getElementById('textsList');
    list.innerHTML = ''; // Clear existing list
    texts.forEach((text) => {
      const item = document.createElement('li');
      item.textContent = text;
      list.appendChild(item);
    });
  }

  // Load all texts on initial load
  document.addEventListener('DOMContentLoaded', fetchAllTexts);
This app.js script implements the functionality to save texts via the /save endpoint and fetch all texts from the /all endpoint. It facilitates the interaction between our frontend and backend.
Step 4: Running Your Application
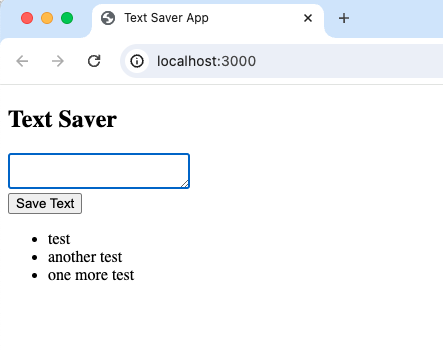
Let’s start our Node.js server by running node server.js and then navigating to http://localhost:3000 in your web browser. You should see your Text Saver application’s user interface, ready to accept input.
Here’s what you should do next to test the full functionality:
- Type some text into the text area.
- Click the “Save Text” button. This sends your text to the server, saving it in memory.
- The page should automatically update to list your saved text below the text area.
Understanding What We Built
- Backend (Node.js + Express): Our server handles HTTP requests, serves static files, and provides two API endpoints. One endpoint saves text sent in a POST request; the other returns all saved texts in a GET request.
- Frontend (HTML + JavaScript): The user interface where users can input text to be saved. It interacts with the backend via API calls to save and retrieve texts.
Why This Matters
Building this simple application demonstrates several foundational concepts in web development and cloud-native applications, including:
Client-server architecture: Understanding how the frontend (client) interacts with the backend (server) is crucial for web development. RESTful API design: Our endpoints follow REST principles, making them predictable and easy to use. State management: We manage application state (saved texts) in memory, which while not persistent across server restarts, teaches the basics of data handling.
Conclusion
I’m excited to have started this journey with Salaboy as my mentor. Through challenges like these, I’m not only learning about technology but also about structuring projects and thinking critically about design and architecture. Stay tuned for more updates as I progress through this mentorship program. Feel free to clone the repository, try out the challenge yourself, and share your thoughts and suggestions!
Happy coding, and see you in the next challenge!